
No Bake Chocolate Pumpkin Bars (Gluten Free & Refined Sugar Free)


I am an Amazon Affiliate. This means I may earn a commission at no extra cost to you if you make purchases through the links on this page.
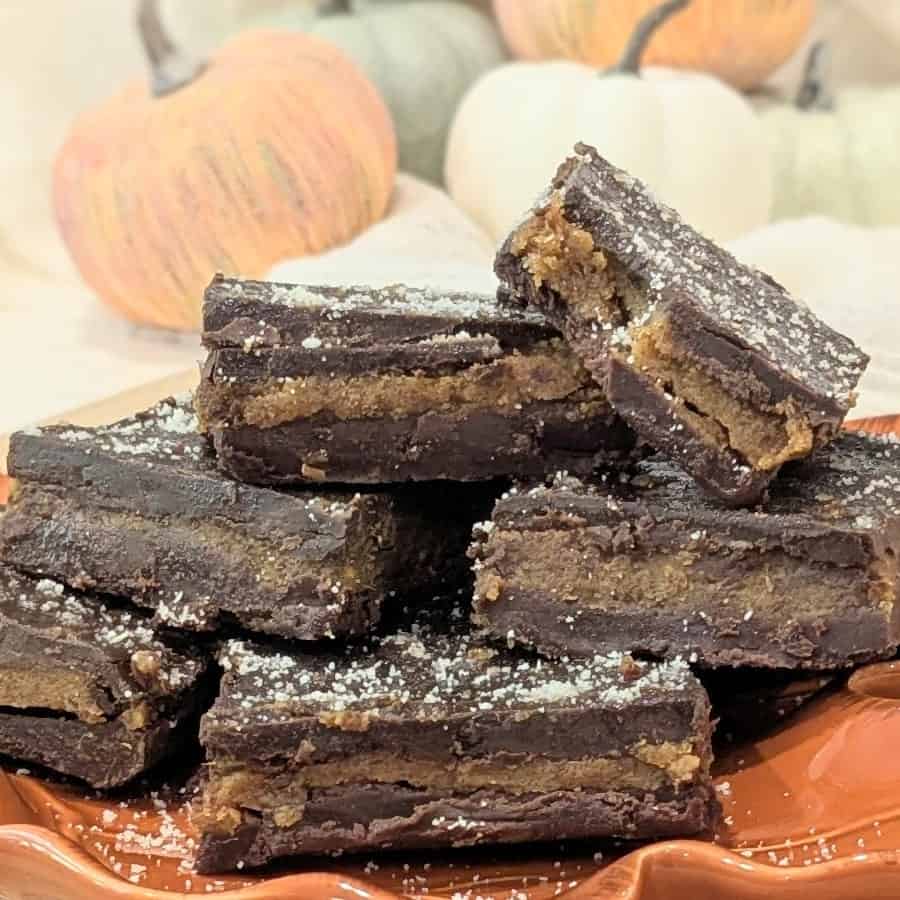
A Decadent, Healthy Fall Treat
I love that fall flavors are everywhere right now. And I love that I’m finally having some success making pumpkin treats my kids actually like – no, love! And these chocolate pumpkin bars are my latest and greatest pumpkin success 🙂
Sweetened with date paste and raw honey, this wonderful fall dessert is entirely refined sugar free. It is also effortlessly gluten free. Plus, each bar contains a hearty 4 grams of protein.
But even better, these pumpkin chocolate bars are rich with chocolate and fall spice that kids thoroughly enjoy. Let me describe them to you this way: These are essentially a brownie pumpkin pie candy bar.
Are you drooling yet?
I have to be honest with you. This is a tough one to share with the kids 😀 But thankfully, these no bake pumpkin bars are so easy to make, you won’t mind making a second batch when the first one is gone in the blink of an eye.

Since these healthy pumpkin spice brownies do not require any baking, essentially all you need to do is mix some ingredients together and melt your chocolate. I just love no bake treats that don’t require me to arrange my schedule around the oven timer, don’t you?
Plus, when your kids want a yummy fall treat pronto, you can whip these up for them pretty quickly. Because we all know how short kids’ patience is when they are hangry or ready for dessert.
These are truly the perfect guilt free satisfaction for kids with a sweet tooth. You can serve these chocolate pumpkin bars freshly made for an ooey-gooey experience or after the chill time for a little bit of crunch from the chocolate topping – depending on your kids’ preference.
If you need a chocolate spiced fall treat that is sure to please kids (and adults too), this is definitely the recipe you’re looking for 🙂

The Perfect Occasions for Pumpkin Brownie Bars
These pumpkin chocolate brownie bars are quite rich and chocolatey, so even though they do contain some bonus protein (yay!), I reserve these as dessert rather than snacks for my kids. However, you could use these as a special after school snack as well.
You could also send a healthy pumpkin bar with your child to school for dessert after lunch. That is what I’ve been doing for my 7-year-old. She always gets dessert in her school lunch since dessert is practically a life or death necessity for her.
I also made a batch of these to take to a get-together with our neighbors and their kids. I didn’t get a chance to ask the kids if they liked them, but there were quite considerably less bars in the container by the end of the night, so I’d say they went over well 🙂

You could even make these as an easy treat to share at your family Thanksgiving meal. You can keep them chilled over ice or leave them at room temp for a gooey, scoopable treat. It is really good both ways!
By the way, while we are on the topic of treats to take to a Thanksgiving meal, make sure you check out my recipes for date caramel corn and chocolate covered caramel apples as well. The caramel corn in particular is another super easy treat to throw together.
If you want some naturally sweetened, healthier treat options for your kids to eat at your family Thanksgiving gathering without being conspicuous about it, just bring something delicious everyone can eat. No one will even suspect they are healthy alternatives. And you won’t have to single out your child by limiting their added sugar intake in this way.
But honestly, you don’t need any special excuse to make these delicious chocolate pumpkin bars. All you need is a sweet tooth in your house as a good reason to whip up a batch of chocolate and pumpkin goodness 😀

Ingredients
- Butter: Butter is in all three of these luscious layers to add richness and to help the layers firm up in the fridge. I use Irish grass-fed butter or organic.
- Honey: Raw, unfiltered honey has the most health benefits and becomes viscous when chilled, making it an ideal natural sweetener for treats that need to firm up in the fridge. I currently find the best price on raw honey from Amazon, but you can also get it from Trader Joe’s and sometimes Home Goods.
- Peanut Butter: Natural unsweetened peanut butter keeps these pumpkin brownie bars free from all refined sugar. I like Kirkland brand of peanut butter best (from Costco) because it has a little bit of a naturally sweet flavor and it is easy to mix.
- Cocoa Powder: Cocoa powder is a quick and easy way to add that rich chocolate flavor to the brownie layer. I often use cacao powder which is less processed, but any cocoa powder will do.
- Collagen: I love the Mama Natural collagen powder because of it’s gut health benefits and I can see a positive impact on my daughter’s mood and physical well-being when she’s getting it regularly.
- Pumpkin: Canned pumpkin puree is the base of the pumpkin layer. Make sure you get pure pumpkin puree and not pumpkin pie mix.
- Date Paste: I don’t like to taste honey in my treats and my kids don’t either, so date paste is a better sweet pairing with the pumpkin layer. Date paste is super easy to make yourself and can be made in large batches to pull out of the fridge whenever you need to make a healthy sweet treat. Use my extra simple recipe for making date paste once and you’ll be able to do it forever without a recipe.
- Pumpkin Pie Spice: Pumpkin pie spice gives that extra little zing of cozy fall flavor in the pumpkin layer. I have been making my own based on this simple, 5-ingredient recipe from The Pioneer Woman. However, you can also use a store-bought pumpkin pie spice blend.
- Unsweetened Baker’s Chocolate: Unsweetened baker’s chocolate is the perfect base for chocolate that you want to harden when it is cool. In this pumpkin bar recipe, I use baker’s chocolate to make the hard chocolate coating on top. Make sure to get unsweetened baker’s chocolate.

Instructions
Chocolate Brownie Layer
Step 1
Line an 8×8 pan with parchment paper.
Step 2
Add all ingredients to a medium-size bowl and mix until fully combined.
Step 3
Spread brownie mixture on the bottom of the pan evenly.
Pumpkin Layer
Step 1
Add all ingredients to a medium-size bowl and mix until fully combined.
Step 2
Spread pumpkin mixture over the chocolate brownie layer evenly.
Chocolate Coating
Step 1
Add all ingredients to a small pot on the stove.
Step 2
Heat on low, stirring constantly until everything is melted and combined. Once everything has melted, turn off the heat immediately to avoid overheating.
To help prevent overheating, you can also melt your chocolate in a double boiler or a glass bowl inside of a pot of simmering water.
Step 3
Poor the melted chocolate over the top of the pumpkin layer and spread evenly.
Step 4
Place the pan in the fridge for 45 minutes to serve firm or in the freezer for 20 minutes.
Alternatively, you can also serve warm if your child prefers everything melty and gooey.
Step 5
To store, once the bars have firmed up in the fridge or freezer, cut into squares with a sharp knife and place into an airtight container, separating with parchment paper if you need to layer them on top of each other.
Store in the fridge for up to one week or the freezer for up to three weeks.

Substitutions & Tips
- These gluten free pumpkin chocolate bars could also be made dairy free by replacing the butter with an equal amount of coconut oil in all three layers.
- If you don’t want to use peanut butter, you can sub in almond butter, tahini or another nut or seed butter of choice.
- The collagen in this recipe is optional. I like to use the Mama Natural collagen for gut health because it helps my daughter, but you can omit this or use your own preferred collagen if you want.
- If you find it challenging to spread the pumpkin layer on top of the chocolate brownie layer, stick the brownie layer in the freezer for 10 minutes to firm it up a bit. This will make it easier to spread the pumpkin over the top.
- I advise against making these directly in a pan without any parchment paper as they do stick to the bottom of the pan and are very difficult to get out this way.

Chocolate Pumpkin Bars
Ingredients
Chocolate Brownie Layer
- 56 g butter melted
- 100 g unsweetened natural peanut butter
- 50 g cocoa powder
- 75 g honey raw
- 16 g collagen optional, Mama Natural Brand
Pumpkin Layer
- 56 g butter melted
- 85 g pumpkin canned
- 100 g homemade date paste or store-bought date paste softened with hot water
- 1/2 tsp pumpkin pie spice
Chocolate Coating
- 71 g unsweetened baker's chocolate
- 42 g honey raw
- 28 g butter
- almond flour for dusting optional
Instructions
Chocolate Brownie Layer
- Line an 8×8 pan with parchment paper.
- Add all ingredients to a medium-size bowl and mix until fully combined.
- Spread brownie mixture on the bottom of the pan evenly.
Pumpkin Layer
- Add all ingredients to a medium-size bowl and mix until fully combined.
- Spread pumpkin mixture over the chocolate brownie layer evenly.
Chocolate Coating
- Add all ingredients to a small pot on the stove.
- Heat on low, stirring constantly until everything is melted and combined. Once everything has melted, turn off the heat immediately to avoid overheating. To help prevent overheating, you can also melt your chocolate in a double boiler or a glass bowl inside of a pot of simmering water.
- Poor the melted chocolate over the top of the pumpkin layer and spread evenly.
- Place the pan in the fridge for 45 minutes to serve firm or in the freezer for 20 minutes.Alternatively, you can also serve warm if your child prefers everything melty and gooey.
- To store, once the bars have firmed up in the fridge or freezer, cut into squares with a sharp knife and place into an airtight container, separating with parchment paper if you need to layer them on top of each other.Store in the fridge for up to one week or the freezer for up to three weeks.
Notes
- If you choose to use store-bought date paste instead of homemade, use 3/4 of the amount and add the remaining 1/4 in hot water. Mash with a fork until you have a spoonable consistency.
- If you have trouble spreading the pumpkin layer on top of the chocolate, place the chocolate layer in the freezer for 10 minutes to firm it up before adding the pumpkin layer.
- You can sub the peanut butter with your choice of other nut or seed butters.
Nutrition
Grab Your Free No-Bake Recipe eBook!
My mini ebook gives you 4 naturally sweetened no-bake treats kids love, plus 2 bonus recipes. It’s yours for free, just tell me where to send it!
There’s no catch here; I do not sell your info and I will not spam you. This is simply a thank you for reading Easily unsubscribe anytime!